Artículo que explica paso a paso la creación de un GIF animado utilizando Photoshop y su aplicación asociada Image Ready.
A partir de la versión 5.5 de Photoshop tenemos a nuestra disposición un programa muy interesante para realizar, entre otras cosas, trabajos específicos para el web, como pueden ser la creación de GIFs animados o imágenes que cambien al pasar el ratón por encima (Rollover).
El producto en concreto es Image Ready y vamos a estudiar la manera de trabajar con él, junto con el propio Photoshop, para realizar un GIF animado.
Crear un archivo .psd con los distintos fotogramas
La primera tarea para realizar un GIF animado con Photoshop es crear un archivo .psd, que es el formato propio de Photoshop donde podemos mantener capas, que serán necesarias para realizar el GIF animado.
Cada capa creada con Photoshop puede ser un fotograma del GIF animado, así que podemos crear tantas capas como imágenes queramos que haya en la animación. Luego con Image Ready podremos intercalar esas capas en el orden que queramos y asignarles un tiempo de visualización a cada.
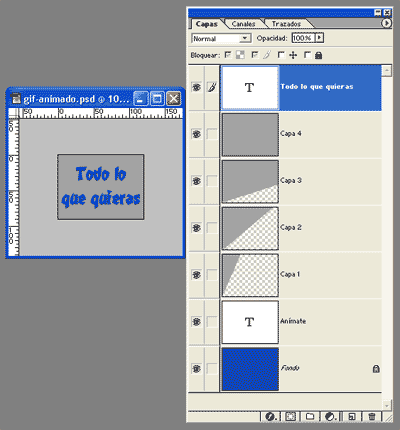
 Una vez creada la imagen con las distintas capas con Photoshop, podemos guardarla con extensión .psd, para que guarde toda la información de las capas. Una vez guardada podemos pasar el archivo a Image Ready, que es el programa que utilizaremos para animar las capas en un GIF animado.
Para pasar el archivo desde Photoshop a Image Ready cómodamente, podemos utilizar un botón que hay en la parte de abajo de la barra de herramientas. El botón se encuentra en los dos programas y podemos verlo remarcado en la imagen de la derecha.
Trabajo con Image Ready
Para definir cada uno de los fotogramas de la animación y sus propiedades tenemos una ventana llamada Animación. Si no la vemos al abrir Image Ready podemos mostrarla en el menú de Ventana > Mostrar animación.
La ventana de animación contiene un botón para añadir fotogramas que tiene forma de documento nuevo. En cada fotograma podemos seleccionar de manera independiente las capas que se desean visualizar, de modo que debemos crear los distintos fotogramas de nuestra animación e indicar qué capas se deben visualizar en cada uno de ellos. Por cierto, las capas se pueden hacer visibles o invisibles desde la ventana de capas con el ojo que hay al lado de cada una de las capas. Cuando se puede ver el ojo la capa es visible y cuando no hay ojo es que es invisible.
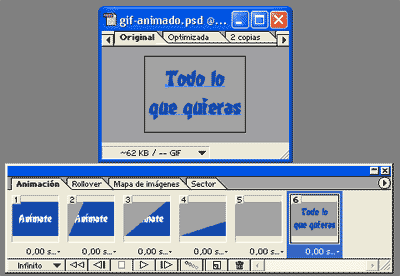
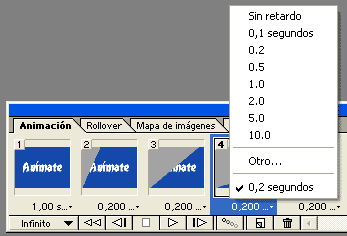
Para asignar el tiempo de visualización de cada uno de los fotogramas tenemos un registro de los segundos de visualización justo debajo de la miniatura del fotograma. Al pulsar sobre ese registro de segundos aparecerá una ventana donde seleccionar cualquier duración, en segundos.
Cuando tengamos la animación tal como deseamos que aparezca en nuestra página web seleccionamos en el menú Archivo, la opción "Guardar optimizada como..." y nos aparecerá la ventana típica para seleccionar el directorio y el nombre de archivo que queremos asignarle.
Optimizar la imagen con Image Ready
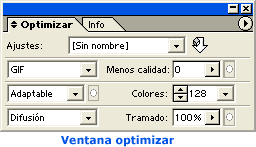
Podemos modificar las propiedades de la imagen GIF, como número de colores o el tipo de paleta para optimizar la imagen, con objeto de que ocupe el menor espacio posible en bytes y sea rápida de descargar. La optimización se debe realizar respetando la calidad de la imagen tanto como seamos capaces. Para realizar estas acciones Image Ready dispone de una ventana llamada Optimizar, que si no aparece podremos mostrarla desde el menú Ventana > Mostrar optimizar.
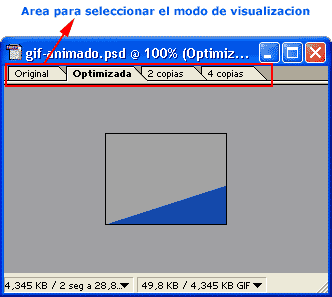
La característica más interesante para optimizar en un fichero GIF es el número de colores. Por lo general, a menor número de colores, menor tamaño del archivo. En la ventana del documento podemos encontrar unas solapas que nos permiten seleccionar la versión de la imagen que queremos visualizar: la versión Original o la Optimizada. Las solapas 2 copias o 4 copias permiten comparar entre la versión original y algún tipo de optimización.
Resultado obtenido
Para realizar este artículo hemos creado un GIF animado que se puede ver a continuación. No es muy atractivo, pero será interesante ver el resultado conseguido.

| Referencia: Podemos saber lo que es un GIF animado en un artículo de DesarrolloWeb.com.Vídeo: Puedes ver todo este proceso de creación del Gif animado en un videotutorial. |
Crear un archivo .psd con los distintos fotogramas
La primera tarea para realizar un GIF animado con Photoshop es crear un archivo .psd, que es el formato propio de Photoshop donde podemos mantener capas, que serán necesarias para realizar el GIF animado.
| Nota: Las capas son propias de Photoshop y de otros programas de diseño gráfico y permiten editar partes del gráfico de manera independiente. Quien quiera dominar Photoshop y similares deberá familiarizarse con el trabajo con capas. |
Cada capa creada con Photoshop puede ser un fotograma del GIF animado, así que podemos crear tantas capas como imágenes queramos que haya en la animación. Luego con Image Ready podremos intercalar esas capas en el orden que queramos y asignarles un tiempo de visualización a cada.

 Una vez creada la imagen con las distintas capas con Photoshop, podemos guardarla con extensión .psd, para que guarde toda la información de las capas. Una vez guardada podemos pasar el archivo a Image Ready, que es el programa que utilizaremos para animar las capas en un GIF animado.
Para pasar el archivo desde Photoshop a Image Ready cómodamente, podemos utilizar un botón que hay en la parte de abajo de la barra de herramientas. El botón se encuentra en los dos programas y podemos verlo remarcado en la imagen de la derecha.
| Nota: La acción de pasar de un programa a otro será muy repetida durante el trabajo con Photoshop e Image Ready, puesto que cada programa tiene unas capacidades distintas y las acciones que se hacen con un programa no tienen porque estar disponibles en otro. Por ejemplo, si queremos editar una capa, debemos hacerlo desde Photoshop y si queremos crear fotogramas y seleccionar las capas que se deben visualizar en cada uno, deberemos hacerlo con Image Ready. Es aconsejable guardar el archivo .psd antes de pasar de una aplicación a otra. |
Trabajo con Image Ready
Para definir cada uno de los fotogramas de la animación y sus propiedades tenemos una ventana llamada Animación. Si no la vemos al abrir Image Ready podemos mostrarla en el menú de Ventana > Mostrar animación.
La ventana de animación contiene un botón para añadir fotogramas que tiene forma de documento nuevo. En cada fotograma podemos seleccionar de manera independiente las capas que se desean visualizar, de modo que debemos crear los distintos fotogramas de nuestra animación e indicar qué capas se deben visualizar en cada uno de ellos. Por cierto, las capas se pueden hacer visibles o invisibles desde la ventana de capas con el ojo que hay al lado de cada una de las capas. Cuando se puede ver el ojo la capa es visible y cuando no hay ojo es que es invisible.

Para asignar el tiempo de visualización de cada uno de los fotogramas tenemos un registro de los segundos de visualización justo debajo de la miniatura del fotograma. Al pulsar sobre ese registro de segundos aparecerá una ventana donde seleccionar cualquier duración, en segundos.

Cuando tengamos la animación tal como deseamos que aparezca en nuestra página web seleccionamos en el menú Archivo, la opción "Guardar optimizada como..." y nos aparecerá la ventana típica para seleccionar el directorio y el nombre de archivo que queremos asignarle.
Optimizar la imagen con Image Ready
Podemos modificar las propiedades de la imagen GIF, como número de colores o el tipo de paleta para optimizar la imagen, con objeto de que ocupe el menor espacio posible en bytes y sea rápida de descargar. La optimización se debe realizar respetando la calidad de la imagen tanto como seamos capaces. Para realizar estas acciones Image Ready dispone de una ventana llamada Optimizar, que si no aparece podremos mostrarla desde el menú Ventana > Mostrar optimizar.
La característica más interesante para optimizar en un fichero GIF es el número de colores. Por lo general, a menor número de colores, menor tamaño del archivo. En la ventana del documento podemos encontrar unas solapas que nos permiten seleccionar la versión de la imagen que queremos visualizar: la versión Original o la Optimizada. Las solapas 2 copias o 4 copias permiten comparar entre la versión original y algún tipo de optimización.


| Referencia: Hablamos sobre formatos gráficos y la optimización de imágenes en cada uno en un artículoFormátos gráficos para páginas web. |
Resultado obtenido
Para realizar este artículo hemos creado un GIF animado que se puede ver a continuación. No es muy atractivo, pero será interesante ver el resultado conseguido.

Download Source Files
- Source files for this tutorial are available to Premium members.
Get a Premium Membership
In this tutorial, we’ll take a look at the Photoshop animation feature to create a nice animated GIF. I’m sure all of you already noticed the ads at the right side of this page. For some of you, they are annoying, others even click on them, which is why they are there. I personally think there’s nothing to be said against them, so I thought why not creating a nice 125 pixel by 125 pixel ad to demonstrate how easy it is to create nice animations inside of Photoshop.
All we need to do is open up Photoshop, create our final image and animate it the way we want it to move the single elements to achieve the final effect. Additionally, we’ll stop by at the beautiful GraphicRiverwebsite, where we’ll download their logo, which we’ll use to create our GIF.
Final GIF Preview
Take a look at the animated GIF we’ll be creating below. Want access to the full PSD files and downloadable copies of every tutorial, including this one? Join Psd Plus for just $19/month.
Step 1
First, open up Photoshop and create a new 125 pixel by 125 pixel document. In our case, a 72 pixel/inch resolution and the RGB Color mode with a white background will be sufficient, since we’ll use it on the web.
Step 2
Now, unlock the Background layer, call it “BG” for Background and select the Paint Bucket Tool (G). Instead of using the rich black (#000000) for the background, I use the slightly brighter #111111 black, which looks better. Click to fill the layer.
Step 3
Gradients in designs, layouts or images are very popular and give your final product an extra glance. That’s why we’ll now select the Gradient Tool (G). Choose the Radial Gradient from the options bar and make sure the gradient goes from white to transparent. The images below show you how to do it.
Step 4
After selecting the Radial Gradient, going from white to transparent, it’s time to operate. Put your mouse in the center, click and hold, and drag it to the right. For a straight line and better control, press the Shift key while dragging. The image below shows you how it should look afterwards. Make sure you give this layer a name like “Gradient” and play with its opacity for a smoother look.
Step 5
You might not have noticed it, but our final image includes a nice dark gray one pixel border, which helps emphasize the logo and text, which we’ll add later. There are multiple ways of creating this border, but the way I did it in this tutorial, was as follows:
First, select the Rectangle Tool (U). After that, open up the Rectangle options in the Options bar to set a fixed size of 123 pixels by 123 pixels. The color isn’t important, just make sure you align it properly. Click inside the canvas to create a square. Make sure it covers the Background layer, but reveals it at the edges. I called this layer “Extra.”
Step 6
Now, it’s time to open up the Layer Style window. To do that, double-click on the Extra layer. What we need to do, is bring down the Fill Opacity to 0 and give it an inner 1 pixel stroke with a dark gray (#4d4d4d) color. Take a look at the images below for reference.
Step 7
As mentioned earlier, we’ll now jump over to graphicriver.net to download the nice pre-designed logo files. I highly recommend signing up to graphicriver.net to join the Author Program, or simply shop beautiful graphics.
Should you already be a member, make sure you check out the Referral Program where you can receive a 30% commission from the first Cash Deposit a referred user makes! By selling or buying different graphics and layered files, you’ll be able to either earn money or support other designers with your work.
Now click on the Make Money button in the main navigation to reveal the sub-navigation. Click on Referral Program and scroll down until you can see the Referral Graphics. You can choose between the different marketplaces and download their logos and graphics in high quality. I chose the graphicriver.net logo, but from this point, you can choose the one you like the most. Please make sure you read the Copyright Policy to avoid problems.
Step 8
This is how the logo will look like inside of Photoshop. As you’ve noticed, each Graphic Pack comes with layered PSD files. What we’ll do now, is drag or copy and paste the logo to our animation project.
Step 9
In this case, the logo fits perfectly, but should it be too big or small, just transform it. As you can see in the image below, I placed the logo at the top and added additional text at the bottom-left side. Those are just a few things that you can find and buy on graphicriver.net. Make sure the logo and text are on separate layers. It is important to place them on separate layers, since we later want to turn single layers on or off to create our animation.
Step 10
In the next step, I’ll be using Illustrator to create the waves, which we’ll place at the bottom right side. Some of you might think: why isn’t he just doing it inside of Photoshop? I could, but the reason why I’m doing this inside of Illustrator is because I want to explain the difference between Smart Objects, Pixels, Paths and Shape Layers while importing. If you don’t have the opportunity to use Illustrator, then just grab the Pen Tool inside Photoshop, or use any other technique you like to create the nice waves.
Step 11
As you can see in the image below, I grabbed the Pen Tool to draw two triangular, but curved shapes. Make sure there’s no border set and the shape color is blue.
Step 12
We don’t want two similar colored waves so make sure you use two different tones. These are the ones I used.
Step 13
And this is how it should look like. It doesn’t matter how big it is at the moment, since we’ll only use the curved part of it and the rest will be out of sight. Select both shapes and copy and paste or drag it over to Photoshop.
Step 14
Photoshop will instantly ask you how you would like to paste the object. As mentioned earlier, you can choose between: Smart Object, Pixels, Path or Shape Layer. Some of them will obtain quality while others will make subsequent changes – without quality loss – impossible.
- Smart Object: Pastes the art as a Vector Smart Object that can be scaled, transformed, or moved without degrading the image. As the art is placed, its file data is embedded in the Photoshop document on a separate layer.
- Pixels: Pastes the art as pixels that can be scaled, transformed, or moved before it is rasterized and placed on its own layer in the Photoshop document. As soon as you confirm the changes, the object will be rasterized which will result in quality loss, should you want to change it at a later time.
- Path: Pastes the art as a path that can be edited with the pen tools, Path Selection Tool, or Direct Selection Tool. The path is pasted into the layer that’s selected in the Layers panel.
- Shape Layer: Pastes the art as a new shape layer (a layer containing a path filled with the foreground color). This can be useful in some cases, but we don’t need this for this project.
Select the Smart Object option and click on OK.
Step 15
We won’t need the entire object, so feel free to resize and position it the way you like. I did it as shown below.
Step 16
Now, it’s time to create the cool shine effect which hovers over our logo and waves. It’s a very simple technique, but the outcome is cool. The first step is choosing the Elliptical Marquee Tool with a 10 pixel feather. I’m using a Feather of 10 pixels on it because we don’t want it to be sharp-edged, which would definitely not look good. Make sure the selection is still inside of our 125 pixel by 125 pixel canvas with enough space around it to be filled with a bright color. Select the Paint Bucket Tool and click inside the active selection.
Step 17
As you can see, we now have a bright, smooth and highlighted ellipse, which will build up the nice glow effect. But one thing’s for sure, it doesn’t look nice this way. We have to limit the highlighted area to the logo, text and waves.
The way I did it, is by selecting the single objects one after another by Shift-clicking on the proper layer thumbnails to create a quick selection of the elements. Now obtain the selection, click on the “Glow” layer and choose Add layer mask.
The layer mask will black out and hide the unselected area, while the white area will display the glow effect on the logo, text and waves. Should the glow be to intensive, simply adjust the brightness by changing its opacity. That’s it. Our final image is done. In the next step, we’ll take a look at how to animate this design.
Step 18
Normally, the animation panel isn’t visible, but you can open it by going to Window > Animation. By default, the Animation panel will open up at the bottom.
Step 19
This is how it will look like by default. It’s the Timeline view, which we don’t want to use in this project. Instead, we’ll work in the Frame view where we can see each animated frame listed inside the Animation panel. To change the view, click on the little fly-out menu button and select Convert to Frame Animation. The images below show you how to do it.
Step 20
In Photoshop, you use the Animation panel to create animation frames. Each frame represents a configuration of layers. The first image below, shows you the Frame listing I mentioned above. The second image, shows you exactly how to configure your layers to achieve the final animation.
Simply select the first Frame, turn on, off or move the elements like mentioned below and you’re done. Work off each Frame after another until you have six frames listed in the Animation Panel. In the next step, we’ll create the tweening, which will add additional frames to create our smooth fade in or moving animation effects.
Step 21
The first step in the animation process is to specify a delay (the time that a frame is displayed) for single frames or for multiple frames in an animation and the tween. As you can see, I’ve changed the frame delay time to 0, which will result in an abrupt switch between the frames.
To make the switch more smooth, we’ll use the Tween command to automatically add or modify a series of frames between two existing frames. You can either tween with the previous frame or the next frame. In this case, we’ll tween with the previous frame. By doing this Photoshop will create the appearance of movement and smooth fade.
To add additional frames, click on the Tween command, enter a number and hit OK.
- Frame 1 – Frame 2: Add two additional frames.
- Frame 2 – Frame 3: Add two additional frames.
- Frame 3 – Frame 4: None.
- Frame 4 – Frame 5: Add five additional frames.
- Frame 5 – Frame 6: Don’t add additional frames, but make sure you give the sixth frame a two second delay, since we want it to stay there before looping the animation.
Step 22
You can of course use the play option at the bottom of the Animation Panel to play the animation, but we’ll skip that and export the animation as a GIF directly. We’ll save our project as a GIF file for viewing on the web.
To open up the Save for Web & Devices Window, go to File > Save for Web & Devices. There are a lot of different options for you to play with, but for this project we can use a predefined setting. Make sure you choose GIF as your output file type, play with the settings and hit save. Give your GIF a name and save it to a directory you like. That’s it!
Conclusion
I hope all of you guys reading this tutorial, will use the tips and tricks to create your own animated images inside of Photoshop. The best thing to do is later uploading them to Graphic River for the others to see and buy.
Unfortunately, there aren’t many GIF’s or animated images on Graphic River yet, so your job is to change that! Make sure you sign up on GraphicRiver and upload your designs. That’s it for now and I hope this tutorial was useful for you and informative. Feel free to leave a comment. I’ll try to answer your questions, should there be any. Thanks!


0 comentarios:
Publicar un comentario